Peace of Mind Devices


Index How to (Training) Tracking Panel (Silverlt)
Tracking Panel

When your tracker arrives, you will need to charge it with the charger supplied. Preserve the packaging for a time. Make a note somewhere of your device number, the GPS2find.com web address and our phone number.


Before using your tracker, you first need to configure the Tracking Panel using either a Windows or an Apple MacOS computer that has Microsoft Silverlight installed. Use any browser other than Chrome who recently stopped supporting Microsoft's Silverlight. If not already installed, you need to install it - see the HowTo on ...install MS Silverlight, which functions like Adobe Flash. It should automatically prompt installation when you first go to the Tracking Panel
The Tracking Panel is a user interface for computers (Windows/MacOS) that can run Silverlight. Apple only supports Silverlight on MacOS but not on iOS devices, so iPads and iPhones users need to download and use the iOS app (called "mytrackingapp") from the App Store to which there is a direct link on the left edge of this/every page. We also recommend installing a shortcut link to the HTML Tracking Panel-Mobile onto Homescreens which will work on anything. Similarly Android devices need to use the Android app (called "GPS2Find") in the Play Store. A homescreen link to the Tracking Panel [Mobile] is also recommended on Androids too. It doesn't allow users to access or set ALL configuration parameters so customers need access to a Windows or MacOS computer as well. See the HowTo on ...use the Track Panel (Mobile)
Go the web address www.gps2find.com/trackingpanel or press the Tracking Panel button on the red menubar above. You could add a link to this to your Favourites / Bookmarks / phone Home-screen to speed up access.
When you go to this page, a plug-in loads, after which enter your Device ID (6 digit number) which is both on a label on the device and the box, or your Account Reference if your login has been changed.
 then >>
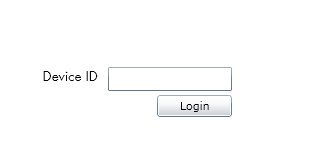
The tracker's unique identifing number is important and it should be written down somewhere safe or put into your phone. You will not be able to track your tracker without this number. The server then checks that this number is valid, and looks up to see whether a password has been set. If it has, you then need to enter the password or contact us if you have forgotten it. If the password is accepted, the Tracking panel appears with the tracker's last reported position, placename, position co-ordinates, on a map similar to GoogleMaps. Other information includes speed, direction, battery condition, GPS signal strength, whether Battery-Save mode is switched on, remaining Position and SMS credits or Expiry date if on subscription, and the alarm and battery status.
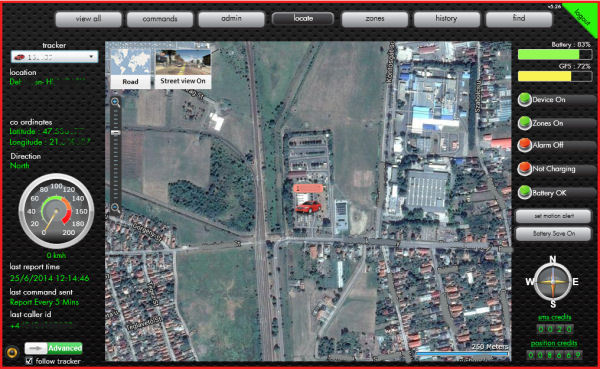
The function of the toolbar buttons along the top are as follows:
View all: Shows all trackers in a composite view if your account has more than one tracker assigned to your account. Alternatively one of them can be selected for display.
Commands: Commands are used to change settings on the tracker. They result in an SMS message being sent to the tracker, and an acknowledgement coming back from the tracker.
Admin: Device name - allows a suitable name/label to be attached to each tracker on screen - keep it short. It is also where alert options are selected, including now zone or Geo-Fence selections, against each contact. Formerly this was done zone by zone.
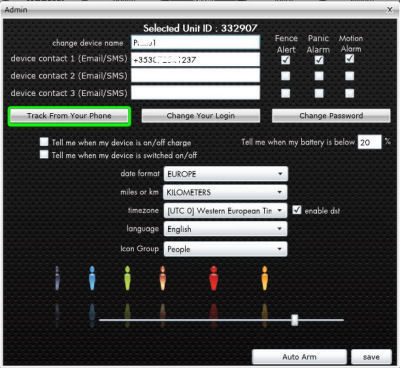
Device name: - the legend for the icon on the map.
Device contact 1 (Email/SMS): - the Email address or mobile phone number to be texted in the event of each alert type (Motion, Panic, Zone, Tamper, Battery). Phone numbers must start with "+" before country code, not "00". Example: +3551231234567
Alert Checkboxes - for each contact, check boxes to select relevant alert types.
Tamper Checkboxes - check if you want to be messaged when/if the device: 1) is turned On/Off, or 2) is taken On or Off charge. These all are Off by default.
Date format - select as preferred.
Miles or km - select as preferred.
Timezone - set as appropriate. Checkbox for Daylight Savings Time needs to checked in Summer only. We will change these for you normally.
Language - 5 languages available (English/French/Spanish/Dutch/Chinese/German).
Icon group - allows selection of the type and colour of the trackers representation on the map.
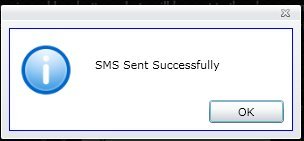
"Track from your phone" button, if pressed prompts for a phone number then sends it an SMS message containing a map (WAPlink) of the last reported position of the tracker.
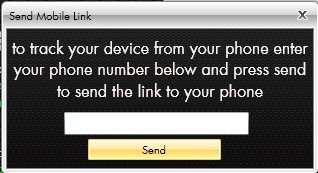
This results in a text message with a link to the Tracking Panel [Mobile] interface at http://mytrackingpanel.com. Providing the phone has an internet connection, clinking the link should present the tracker's last reported position. Enter your Device ID (initially 6 digits) / Account Reference and password if one has been set.
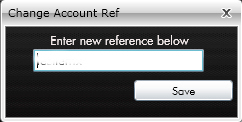
Change your login: - allows the Login to be changed. When pressed it shows the current login, which users can change. If a user has multiple trackers, they can set them all to the same login and password. This will cause all devices to display at the same time on the map in the Tracking Panel. This is known as the "Account Reference" in the Tracking Panel, and the "Device ID" in the Tracking Panel-Mobile interface
This results in a text message with a link to the Tracking Panel [Mobile] interface at http://mytrackingpanel.com. Providing the phone has a mobile internet connection and a browser, the phone should be presented with the Mobile Log-in page. Enter your Device ID (6 digit) or Account Reference (to view multiple devices) and password if one has been set.
 followed by Password if set:
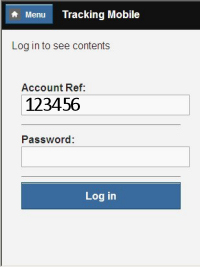
Weak mobile internet connections can present the login on the right seeking a password even if one hasn't been set. If it does, you should seek a location with a better phone signal strength. Entering the tracker number and password, if applicable, should present the last reported position on a map to let you see its last reported position.
Motion alerts and Auto Arm:
The device has the capability to detect motion, even slight motion. To make it motion-sensitive (armed) either manually or automatically, see the HowTo section dealing with Motion alerts and Auto Arm. If the tracker moves when armed, the numbers / email addresses in the Admin section will be messaged within seconds.
Configuring your Admin panel:
To prepare your device for use, you must first review and possibly reset the following parameters.
1) Set the phone numbers/email addresses of the one or more people who are to receive alerts in the Admin section - there probably should be at least one for each alert type;
2) Review the time interval between Position Reports and if necessary change it by sending a Command from the Commands menu. The selected interval should change immediately and display in the botton left corner;
3) Review the date format, etc and change if necessary;
4) Review and possibly change the device name and icon that appears on the map during use, see above.
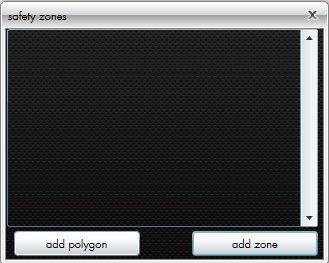
Zones:
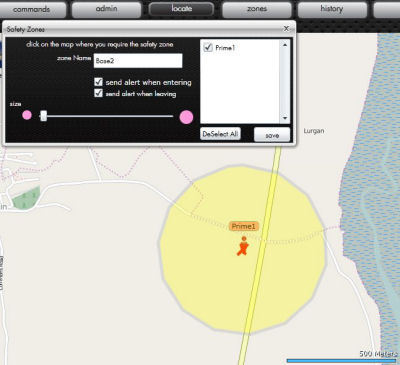
This allows for the setting of up to 4 zones (Geo-Fences) which Users can set to trigger an alert if/when the device enters or leaves (or both) a zone. Thus zones can be centred on a house to protect for example a parked car, or around a marina to protect a boat. The size (diameter) of the circular zones can be adjusted using a slider control. The position of the zone's centre is located by clicking a location on the map, creating a red "X". Their diameter should 500m minimum to avoid false alerts.
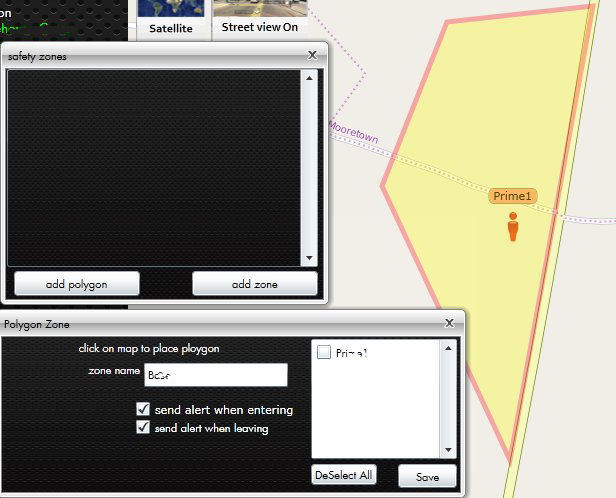
To set a zone press the "Zones" button and press "add zone"

Add Zone: Creates a circular zone that needs a unique name, and to have its size set with the size slider, the position of its centre is set by clicking on the map. Check the tracker ID in the Right hand panel to make the zone active for particular tracker(s). If there is just one tracker, its checkbox gets checked automatically selected on Save. Remember to enter 1-3 mobile phone numbers or email addresses for SMS/email alerts in the Admin panel and check the "Fence Alert" box for each contact as appropriate. Select checkboxes for Entering / Leaving or leave both unselected to suspend but not delete the zone, then press Save. Phone numbers must be mobile phone numbers with a leading "+" then country code +353 (e.g. for Ireland). Drop the leading zero and any spaces for each number e.g. +353869876543.
Add Polygon: Creates a multi-sided shaped zone that also needs a unique name, by clicking the mouse (left) button n times on the map sequentially. The enclosed area is the zone. It size should be larger than a critical space to allow for and avoid edge false alerts. Check the tracker ID in the Right hand panel to make the zone active for it. Remember to enter 1-3 mobile phone numbers or email addresses for SMS/email alerts in the Admin panel and check the "Fence Alert" box for each contact as appropriate. Deselect checkboxes for Entering / Leaving or leave both unselected to suspend a zone, then press Save. Phone numbers must be mobile phone numbers with a leading "+" then country code +353 (e.g. for Ireland). Drop the leading zero and any spaces for each number e.g. +353869876543.
Tracking Panel indicators:
In the top right corner, the battery condition at the time of the last report is displayed as a % of full charge, as is the relative GPS signal strength as a %.
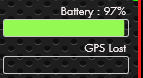
Along the right edge, there are indicators showing whether the tracker is on or off; whether the zone (safety / geo-fence) are On or Off; whether the tracker is in alarm/alert mode, i.e. whether it is alarming at last report; whether it was charging at the last report; whether the battery is sufficiently charged or not; and finally whether the Motion Detection option has been activated (armed) or not.
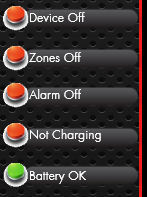 Green is "On", red is "Off" or "Sleeping".
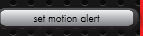
There is a button for Motion Detection, which will make the tracker sensitised to movement if set. The tracker contains an accelerometer that senses movement, or acceleration more than a certain amount in any direction. This function is not linked to zone alarms. The recipients of these alerts will be the alert recipients specified in the Admin section. Make sure that these people aren't being irritated by false alarm alerts, as they may ignore authentic alerts.
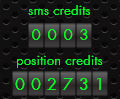
Remaining Credits:
There is a display in the bottom right corner showing either the number of Position and SMS credits remaining, OR the number of days remaining and expiration date of an unlimited credit period if a Subscription period has been purchased.
 or
or 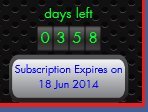 or
or 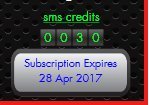
Battery Save mode:
By default, the Battery Save mode is initially disabled to allow users to first become familiar with how to use the tracker. If required, it can be enabled on request, by contacting us including the device ID to info@gps2find.com. This is to prevent confusion in the early stages of ownership. See the HowTo section on ...use Battery Save mode.